Introduction to V4.20-beta release
Combination Keypad Firmware and Database Loader
Version 4.20 represents a significant improvement over version 4.12. The improvements combine exciting new capabilities with whole new sets of astronomical data. Because of the new data and changes to how the existing data are stored it is imperative that BOTH the keypad program and the database firmware be loaded and installed at the same time. Version 4.20 keypad software will not function properly without the version 4.20 database and the v. 4.20 database will not work with earlier software versions. Because of this, we have developed a combination loader that will guide you through from start to finish. This is a departure from earlier versions where a keypad version could be upgraded without also upgrading the database. Here are some of the new features:
-
Five New Catalogs added to the keypad database. Five new catalogs have been added to the keypad database. They are: 1-PAL (Palomar Globular Clusters), 2-LBN (Large, Bright Nebulae), 3-LDN (Large Diffuse Nebulae), 4-GCVS (General Catalog of Variable Stars), and 5-UGC (Uppsalla Galaxies). Altogether there are 8651 new objects to observe.
-
New and Improved What’s Up Now function. The new What’s Up Now function is now totally selectable by object type, object magnitude, and catalog selection. The new What’s Up Now also now includes access to ALL the keypad catalogs.
-
Object Book Mark Tool. This new tool/function permits the user to assemble a custom list of up to 50 objects (all objects, all databases, and custom RA/DEC locations) stored to a Book mark list that you can step through backwards and forwards through the list of book marked objects. The list is fully editable inside the list with automatic ‘next object’ addition code built into the object add function.
-
6 New mount types with two new mount manufactures support have been added to the keypad / GTO control box supported mounts list.
-
Time-zone Zero correction. A fix has been coded to correct for time-zone zero handling when daylight savings is set to ‘1’ or summer and when using EXT mode and/or the keypad to initialize the mount.
-
Search function removed. The search function has been removed in favor of the new improved What’s Up Now function.
-
Altitude/Azimuth (Alt/Az) keypad entry screen now accessible from the Objects Menu. The Altitude/Azimuth keypad entry screen has been moved to the Object Menu replacing the RCAL function.
-
RCAL function moved to RA/DEC reverse menu. The Re-Calibrate function has been moved to the RA/DEC REV button display.
-
SYNC command now restricted to Stars Menu. Because of the importance of the SYNC command, and because errors in its use can cause problems, the SYNC command can now only be accessed through the 1=Objects - 5=Stars menu. For more details, see the Advanced Features section of the Keypad Manual.
Follow the instructions below to load and install the firmware and database onto your GTO Keypad, and THANK YOU for giving the beta release a try. We look forward to your feedback and comments. We believe that the improvements will be well worth the effort involved.
Download the beta releases of V4.20 to your computer
-
The file that you download includes the actual firmware and special installation software to guide you through the upload to your keypad. It can go to a convenient drive\directory of your choice. This can be treated as a temporary file, but make a note of where you stored it so you can find it later to run it.
-
Download the keypad firmware and database to your computer by clicking: keypad420_withDataLoader.exe. and choosing the save option.
-
Navigate to the directory where you stored the file and click on the file to run the installer program. Follow the instructions on your screen. Unless you instruct the installer differently, it will install the programs into your …\programs\Astro-Physics\ … directory.
Upload V4.20 to Your Keypad
Follow these instructions after you have downloaded keypad420_withDataLoader.exe from the Astro-Physics website and installed the program on your system.
Setup the system
-
Before you do anything else, be sure you have written down all of your location, time, backlash, safe zone and horizon limit information. Installing the new software erases all of this information, so you really don't want to skip this step!
-
Set your auto-connect feature to NO or EXT: 2=Setup; 3=Keypad Options; 1 toggles to the correct setting. Once set. shut down the mount and disconnect the keypad.
-
Connect the power cable to the GTO control box. Since the motor cables are not needed for the download, you can use just the GTO control box, you don’t have to use the whole mount. DO NOT connect the keypad at this time. DO NOT turn the power on yet.
Note: If you use the control box without the motor cables and mount you may see a message on your keypad later on when completing the process that says: “Motor Stalled" This is not a problem. Simply press MENU on the keypad to move on.
-
Connect the RS-232 cable to your personal computer and the GTO control box. This upload process will only work if you plug the cable into the TOP RS-232 connector (marked COM 1 on the GTOCPx control boxes). It will not work if you use the bottom connector. You must also use a "straight through" (as opposed to a "null modem or crosswired") serial cable.
Test Procedure
-
IMPORTANT: Your keypad’s Auto-Connect feature MUST be set to NO or EXT. It CANNOT be set to Auto-Connect = YES for this upgrade. If your current version has the Auto-Connect feature, be sure it is set to NO or EXT.
-
Start your PC. The keypad upgrade tool will run under Windows 95 or later.
-
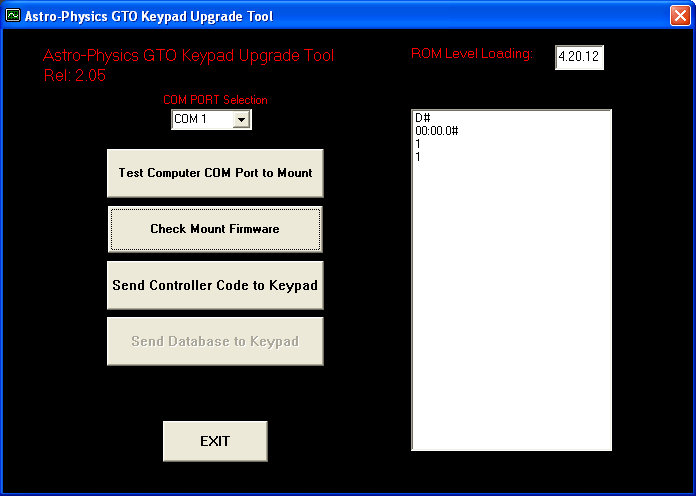
Assuming that you downloaded with the default file location settings, select Start | Programs | Astro-Physics | Keypad Upgrade Tool + V4.20 ROM with Data Loader. The Keypad Update Tool window will display. The white window should display two digits, one above the other, corresponding to the COM port number in the selection box. It will probably be two "1" digits. The ROM Level Loading box will show the version number that you are about to load. If the box does not display 4.2x.xx, then this is not the correct upgrade tool.
-
Double check to be sure your cables are connected as described above, then turn on the power to your control box. Remember that the keypad cable is not connected at this point.
-
Set COM port selection. The number selected will display in the white box.
-
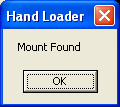
Click on Test Computer COM Port to Mount. Message should read "mount found". If not, check to be sure that your keypad is NOT plugged in. If it is, turn off the power to the control box, unplug the keypad and exit from the Keypad Upgrade Tool. After 30 seconds, turn the power back on and bring up the Keypad Upgrade Tool again. Repeat this step. If you have an error and the keypad is not plugged in, select another COM port.
-
When the "mount found" message appears, look at the entry in the white box. If it shows a series of zeros followed by a "#" sign (i.e. 00:00.0#), you have found the correct COM port. If #:GR# appears in the white box, then that COM port is connected to another device, perhaps a modem or digital camera, etc. If that is the case, try another COM port. Please click "ok" to move on to the next step.
-
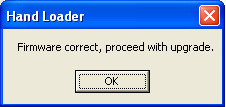
Click the Check Mount Firmware button. The program will poll the GTO control chip to determine if the chip version number will support the upgrade procedure. Chips issued prior to version "C" (shipped prior to January 22, 2001) do not have the upgrade function. The white box will display the chip version number and "#" sign. Don't press the Send Controller Code to Mount button yet. Please read on.
-
If you have the proper chip, press "ok", then turn off the power to your GTO control box. Keep this Keypad Update window open on your desktop since you will use it again shortly. DO NOT press any other buttons on the keypad just yet. Proceed to the Keypad Update section below.
-
If you get an error message, check all cables and connections. Then click the Check Mount Firmware button again TWO times (the first click will clear the buffer and you will see an error code, click it again). You will need to press "ok" at each of the prompts.
-
If the chip is an older version and fails this test, contact Astro-Physics to obtain a new chip. DO NOT attempt to continue this upgrade until you install the new chip. Otherwise, you will erase the old program with no means of installing the new one.
Keypad Update
Do not try this procedure unless you have successfully completed the test above. Otherwise, you will erase the current program from your keypad. The screen will be blank and you will not be able to use your keypad.
Upgrading from all versions - your location data and other settings will be erased during this procedure. Please be sure to write all of the settings that you wish to remember on a sheet of paper. These would include: location data (latitudes and longitudes), time zone settings, backlash settings, safe zones, horizon limits etc.
Please follow these steps in order. If the power is interrupted, restart from step 1.
BE SURE THAT ALL OTHER PROGRAMS ON YOUR COMPUTER ARE CLOSED. SET YOUR SCREEN SAVER TO "NONE". DO NOT ATTEMPT TO USE YOUR COMPUTER WHILE THIS UPGRADE IS UNDERWAY.
- The power to the control box should be off. If not, turn if off.
- Plug in the keypad and be sure that the power cable is connected to the GTO control box and locked in place. The motor cables do not need to be attached.
- Place the keypad on a solid surface and press any three buttons (except stop) simultaneously and hold them down. We call this a "three-finger salute.". As you are holding these three keys, apply the power to the control box.
- A new display will appear on the window of the keypad. At this point, release the three buttons. Then, press the West button to indicate YES for the next four windows. The last window requesting to Test Flash must be responded with NO by pressing the East button. This will erase the current program. These are the screen displays and the responses (note, the display says "FN=No", however you will press the "E" button):
"Load defaults" - Choose Yes (West)
"Are you sure" - Choose Yes (West)
"Clear flash" - Choose Yes (West)
"Are you sure" - Choose Yes (West)
"Test flash" - Choose No (East)
- Once you have completed the previous step, the keypad will be placed in a ready-to-receive mode. A blank window with the blinking cursor in the upper left corner of the screen will indicate this.
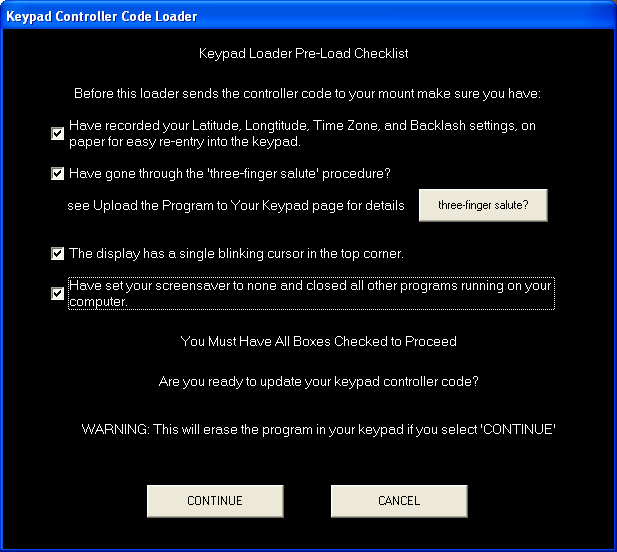
- Look back to the Keypad Upgrade Tool window on your PC. Press the Send Controller Code to Keypad button. The Keypad Loader Pre-Load Checklist will appear. Review and check all boxes, then press Continue.
-
You will hear a series of beeps from the keypad as uploading begins, but will get no audible feedback during the rest of the upload. From this point on, the upload can take anywhere from 20 minutes to 35 minutes. Do not remove the power from the mount. Do not try to run any other application during this time. If you happen to check the task manager of your OS, it will state that the program is not responding, however it really is running properly, just slowly. Since the program must run through the control box into the keypad, it cannot run very fast. Make yourself a cup of tea (or your favorite beverage).
-
As the upload progresses, the white display box within the Upgrade Tool Utility will display a few lines of code, then go dormant for quite a few minutes. Don't worry, the upload is working properly. New code will display periodically, then pause again. If you have any difficulties with the download, please write down the first 10 lines that appear in the box so that we can help to diagnose the problem.
-
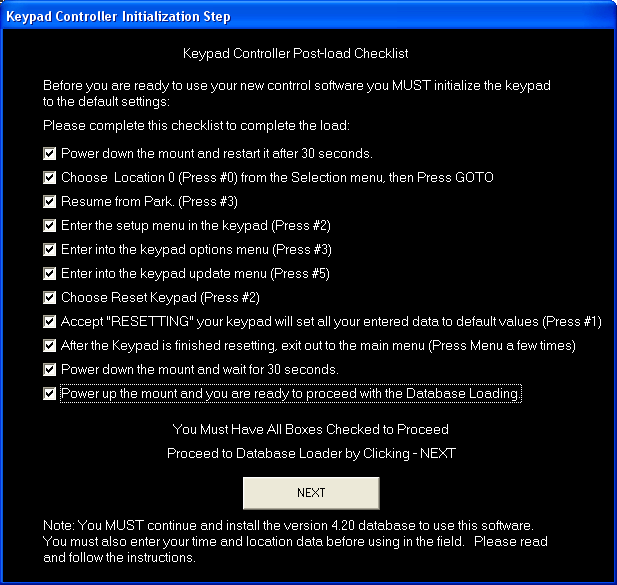
When the upload is complete, the Keypad Controller Post-load Checklist will appear on your computer screen. Please follow each step of the process carefully. This part of the process will set all personal settings to the default settings. This is necessary because of the storage location of this information has changed. We provided checkboxes to help you keep your place. If you accidentally press the wrong button on the keypad, remove power to the control box and follow the steps on the post-load checklist again. (The third step - Resume from Park (Press #3) is where you may get a motor stalled message if you don’t have motors hooked up. If this happens, just press MENU on the keypad to go on.)
-
Your GTO keypad is now updated to the new EPROM code and you should proceed to the database load by clicking NEXT.
Remember - you must have the v.4.20 database to use the v.4.20 software on your keypad, but DO NOT click on the "Send Database to Keypad" button yet! DO NOT close the Combination Loader on your PC! -
You have turned the power to the control box off, waited 30 seconds, and then turned it back on (as outlined in the last two check boxes above). The location selection screen should be on your keypad. Enter "0" and press GOTO. This will take you to the Sync Align and Resume Menu. Then, press 3=Resume from Park to get to the Main Menu.
If the keypad is locked up on the Astro-Physics 4.20 screen, it is likely that Auto-Connect was set to YES prior to the upgrade. Please follow the instructions below to resolve this issue. -
Please refer to the 4.2x Information Manual for further instructions.
What to do if the keypad is locked up on Astro-Physics 4.20 screen
These are known causes related to the keypad. If you are unable to resolve the lockup with the suggestions below, there may be other electrical or mechanical reasons. Please call Astro-Physics.
The power was not turned off for a long enough period of time. Be sure to turn the power to the control box off for at least 30 seconds.
The keypad was set to Auto-Connect YES. To resolve this problem, you have two choices:
- Run Mount Test Utility.
- Establish a link to the mount with external software.
- Set up the mount with the power cable. DO NOT PLUG IN THE KEYPAD.
- Bring up an external computer program that will control the mount - TheSky, DigitalSky Voice, Starry Night or PulseGuide etc.
- Link to the mount with the software program.
- Confirm that you are linked, for instance, slew to an object.
- After you are linked, plug in the keypad.
- The keypad should go to the Main Menu.
Upload V4.20 Database to Your Keypad
Follow these instructions after you have completed the installation of the 4.20 Keypad Controller Firmware as outlined above.
System Setup and Test Proceedure
- With this combination loader, you do not need to go through the entire setup and testing proceedure a second time.
- You will soon be ready to click the "Send Database to Keypad" button on your screen, but NOT YET!
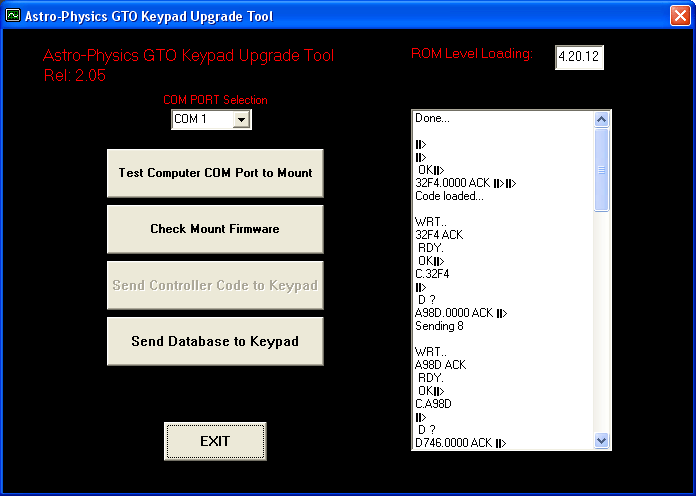
Keypad Database Load
Upgrading the Database for Version 4.20+ ROMS - The new v4.20+ ROMS uses a new database. Do not mix older database releases with the new 4.20+ ROMS as the RA/DEC values for objects will not be correct.
Please follow these steps in order. If the power is interrupted, restart the keypad. When you powered the mount back up at the end of the firmware load, you should have gotten the Location Selection Screen. If you have not already done so, enter location "0" and then press GOTO. This will take you to the Sync Align and Resume Menu. Press 3=Resume from Park to get to the main menu.
BE SURE THAT ALL OTHER PROGRAMS ON YOUR COMPUTER ARE STILL CLOSED. SET YOUR SCREEN SAVER TO "NONE". DO NOT ATTEMPT TO USE YOUR COMPUTER WHILE THIS UPGRADE IS UNDERWAY.
- You should be at the main menu of the keypad. The Keypad Upgrade Tool should still be on your computer screen.
- You should now be ready to place the keypad in the database receive mode.
From the main menu:
- Step 1- Select option '2=Setup' from the main menu
- Step 2- Select option '3=Keypad Options' from the Setup menu
- Step 3- Select option '5=Keypad Upgrade' from the Keypad Options menu
- Step 4- Select option '1=Load Data Base' from the Keypad Upgrade Menu
- A new window will appear prompting you to 'Confirm you are sure' you wish to load the new database. Select the '1=Load' at this time.
- The Keypad will now display the ' -- Awaiting Host -- ' message.
- Press the 'Send Database to Keypad' button on the Database Loader main window running on your PC. You will see another window with a checklist. Go through the checklist and then click “CONTINUE."
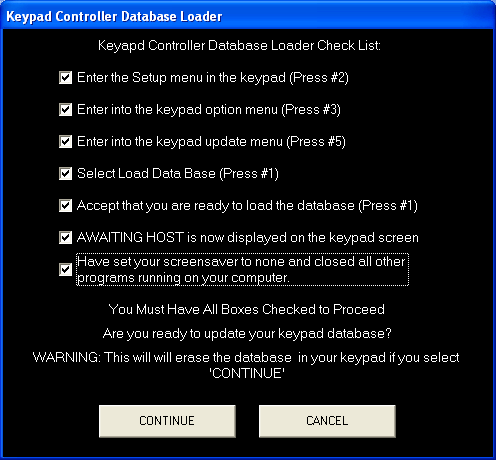
- Once started, the keypad window will display the database loading counters, this is normal. There are 13 banks of information to load, and will be indicated both on the keypad window and on the Database Loader tool window running on your PC.
- This process will now take around 1 hour to complete. When completed, the keypad window will display the 'Done.' message. Simply press the Menu button several times now to return to the Main keypad menu. Power down the mount, exit the database loader tool, your keypad is now updated to the new database. Use as normal now and enjoy!
- Don't forget to re-enter all your location, time, backlash, safe zone and horizon limit information! You will need this information to use your keypad in the field.
Home
Back to top
Printable PDF version
Copyright © 2005-2006, Astro-Physics, Inc. - All Rights Reserved
This page was last modified: July 27, 2006.
Astro-Physics, Inc.
11250 Forest Hills Road, Machesney Park, IL 61115, U.S.A.
Phone: 815-282-1513 Fax: 815-282-9847